Search This Blog

Showing posts with label Wedding Plans. Show all posts

Wednesday, 13 April 2011

Wedding Flowers for the Tables

Today I'm guest posting over at Doberman by the Sea.  I spent a day this past weekend practicing arranging the flowers for my son's upcoming wedding in May.  Come on over and have a look at how the table arrangement worked out. 


And just so you know - they involved using all of these and then some.


Linked to Tablescape Thursday at Between Naps on the Porch
Inspiration Friday at At the Picket Fence
Friday Unfolded at Stuff and Nonsense

Monday, 11 April 2011

Wedding Flowers Practice Day

Saturday was the day - I had no other obligations and my daughter Kate and my friend were both free to help me practice making a bouquet, a boutonniere, and the table floral arrangement for my son's up-coming wedding.  We got them all made and I have to say they worked out really well.  I'm going to show the pictures to Malcolm and Christie to see if there are any changes, but otherwise we are all set to go!


First thing in the morning I went to the local store and bought some flowers including:
  • a couple of large mixed bunches with red, orange, and yellow flowers
  • a bunch with red carnations (as that was what my son had requested for his boutonniere)
  • a small bunch of red-orange tulips

I wanted to re-use the flowers from one arrangement to the next, so I started with the bride's bouquet as it took flowers with the longest stems.  

First, I cut the flowers about 16 inches long and took all the leaves off the lower part of the stems.


Then I arranged the bouquet in my hand building slowly from the centre outward.  I tried to balance the bouquet for colour and had the tulips sticking up slightly more than the other flowers.   When I was satisfied with the arrangement, I wound the stems together with wire.


I then covered the wire with florist tape, pulling the tape as I went so it would stick to itself.


Finally, I wound white ribbon over the florist tape.  We did the ribbon-wrapping twice so I could perfect my wrapping technique.  It definitely looked and felt better when I went over the whole 5-inch area twice with the ribbon.  It helped to have two people working on the bouquet, so one could hold the bouquet and one could work on the ribbon wrapping.


I folded the end of the ribbon under and pinned it in place and then cut the ends of the stems so they were even.


And there you have it - a bright and beautiful bouquet!


After taking some photos, we took the bouquet apart - sniff, sniff - so we could use the same flowers to make a mock-up of the table arrangement that we will be using at the wedding.  I'm only going to give you a sneak peak, though, because I'm saving it for a guest post that I'm doing later this month.  


Then we made a boutonniere.  Malcolm requested that his boutonniere include red carnations so that was where we started.   I collected the flowers in my hand and arranged and re-arranged them until I was satisfied.  I started with a piece of fern, then added two carnations at slightly different heights, and some red berries for textural interest.  I wanted to include another colour in the boutonniere to have it move away from the Christmasy look that red flowers and green foliage can slip into.  I used some small yellow flowers that were perfect and helped tie the boutonniere in with the reds, oranges, and yellows of Christie's bouquet.  

I also wanted to add a little personal touch to both the bouquet and the boutonniere so I went out to the garden and clipped some thyme to use.  It seemed to be just the right touch, since it not only comes from our garden, but Malcolm and Christie love to cook.  

I was running out of time when I was making the boutonniere, so it isn't arranged perfectly and the thyme is hanging out the side at a bit of an odd angle, but you can still get the idea.


I sprayed the boutonniere with water and put it in a plastic bag in the fridge so I could see how well it kept overnight.  


Update:  I was relieved to find the boutonniere in good shape the next day and I took it to show Malcolm when we visited on Sunday. I pinned it on him and although it was a nice arrangement, the overall size was too big.  We decided that for the wedding it would just have one carnation, a tiny bit of fern, and a few yellow flowers.


The nice thing about spending the day arranging flowers are the leftovers.  We have bouquets all over the house and I was able to send my friend home with some as well.


All but the last two photos were taken by Kate.

Linked to Motivate me Monday at Keeping it Simple,
Handmade Tuesday at Ladybug Blessings
Tutorial Tuesday at Hope Studios
Wow Us Wednesday at Savvy Southern Style
Try it Tuesday Party at Dot Dot Dot
Open House Link Party at No Minimalist Here
Feathered Nest Friday at French Country Cottage

Sunday, 3 April 2011

Waterloo Wedding Roadtrip

Malcolm and Christie's wedding is fast approaching so yesterday I went on a roadtrip to Waterloo to visit some of the wedding locations with my daughter Kate and her friend Gabriela, who is going to be the photographer at the wedding.  Gabriela is a student at the Ontario College of Art and Design in photography and does amazing work (you can see her photo blog here).  Our mission on the roadtrip was to take Gabriela to all the places that she would need to take photographs at the wedding so she could check out the lighting and the best angles for the pictures.  Unfortunately Christie was not able to join us as she is working like crazy on her end of term assignments.


The first stop was the church where the service will be held.  It is a fairly modern Anglican Church built in the 1960s, but also incorporates older elements like the vintage pews; organic elements like the wood ceiling; and artisan elements, like the stained glass windows and tapestries.


The stained glass windows were especially lovely and this one was declared the favourite by everyone there.


We had a full agenda and after some lunch went to the park where the formal photos will be taken.  Victoria Park is a gorgeous old park near the downtown with a river running through it and an old iron bridge going to an island, 


with a picturesque gazebo on it.


From which you can take photos like this one.  Won't the wedding pictures look great in this setting?


And by May there will be leaves on the trees, green grass, and flowers in the garden.  Waterloo still has some snow in the shady areas so the flowers are only just beginning to emerge from the ground.


At one end of the island there are a couple of very large willows overhanging the river.   Don't you just love weeping willows?  I have always thought they were so pretty.  This would also make a great spot for some of the photos - well maybe not posed like the first photo below, but more like the other two.


It is a beautiful park and will make a wonderful setting for the wedding photos rain or shine, thanks to the gazebo.  


****************************


Just a reminder to enter my giveaway to win a 16x20 inch photo canvas - see details here.

Linked to Mosaic Monday at Little Red House

Thursday, 17 February 2011

Wedding Bouquet Decisions

Our oldest son is getting married in May and the wedding details are slowly falling into place.  In order to keep costs down and to add personal touches we are doing some of the things for the wedding ourselves.   One of the things I volunteered to do is make the wedding bouquets. 

Ages ago I wrote a post about different colour bouquets that would coordinate with a red bridesmaid dress (which you can read here).   Christie, my daughter-in-law-to-be, looked at the choices and decided that she preferred an assortment of bright flowers (like in the last few photos).  I searched on-line for directions that looked manageable on how to tie the ribbon around the stems to hold the flowers in place and have found several good sources (for example here and here). 

Since it's always fun to look at wedding bouquets I've pulled together some images so we can consider what style of handle would be best.  I was not able to find all of the bouquets in the colours we will be using, but you can still get the idea of how the handle is formed.  There appear to be eight main handle wrap styles:


1)  The ends are tied into a bow (sometimes a big bow as in the first photo or sometimes smaller as in the second and third photos).


Martha Stewart


Bride


Bride


2)  The ends of the ribbon can be tied in a simple knot with the ends left trailing.
 
Martha Stewart

Wedding Dream


3) A wide ribbon is used to wrap the handle and another narrower ribbon is layered on top to finish the look (the first one being a simple version of this and the second one much more complicated).


Martha Stewart

Chez Wedd

4) The ribbon is pinned into the handle with pearl head pins.

Wedding of my Dreams


5) The end of the ribbon is held in place with a decorative button.


Martha Stewart

6) The ribbon on the handle is decorated with one or more pretty brooches.

Wedding Flowers

Style Me Pretty

7) The handle is wrapped with a handkerchief embroidered with the wedding date.


Martha Stewart

8) Moss or vines are wrapped around the ribbon to finish the handle.  Although I think this looks really pretty, it might be a bit messy.
Brides

Aren't they all so gorgeous.  It is hard to decide what style of handle wrap looks best.  I'll be interested to hear what Christie says.  

Once I began collecting inspiration photos, I realized there is a second decision to be made - what colour of ribbon to use.  There seem to be three main choices.

1) Green so it blends in with the colour of the stems.


Better Homes and Gardens


2) White so it coordinates with the bridal gown.


Better Homes and Gardens


3) A colour taken from the flowers or the bridesmaids' dresses.


Better Homes and Gardens


I think looking at those pretty flowers was just what I needed after months of our long snowy winter.  


What type of handle do you like best?  Are there any others that I didn't mention?  


I'm going to check in with Christie after she reads this post (which I know she does) and see what her preference is.

Sunday, 13 February 2011

Spring Fling Strawberry-Pineapple Cupcakes

Yesterday I made cupcakes - not just any cupcakes, though, as these ones:
  • were made to have with family and friends along with some champagne to celebrate our 30th wedding anniversary,
  • were a trial-run of the recipe that we'll be using for Malcolm and Christie's wedding in May,
  • and were used by me to practice taking food photographs.
If you recall in a previous post (here) I looked at eight ways to take better food photos.  I have never taken a picture of food that I was happy with, until now that is.  I'm not looking for perfection, just photos that make you want to try the food.  I knew I had done just that when William walked by the computer and said that my pictures made him want to go and eat a cupcake.


The cupcakes tasted fantastic and just in case you want to make some for your sweeties for Valentine's Day, I've posted the recipe. 


The recipe is from the recent Kraft Canada What's Cooking magazine.  Christie's Grandmother has used the recipe in the past and recommended it.  It's one of those recipes that is easy to make, yummy, and looks good.


The original recipe called for using an angel food cake mix, but I used a white cake mix - either way would be good. 


To make the icing you mix together:
1 pkg (4-serving size) Jell-O Vanilla instant pudding
1 can (14 fl oz/398mL) crushed pineapple in juice, undrained
1 cup thawed Cool Whip Whipped Topping

You gently stir the ingredients together and then spread it on the cooled cupcakes.  Top each cupcake with a half strawberry.


The photo-shoot of the finished cupcakes was a lot of fun.  Here's a look at my set-up.   I taped some craft paper to a chair and then changed the backgrounds in the pictures by using a couple of pieces of scrapbooking paper, a paper doily, and some different plates.  I made sure the light coming in from the window was at 10:00 as per the tips in my food photography post.  And that's as fancy as I got.


And just so you know - the cupcakes were sampled and come with our stamp of approval.


Linked to Wow Us Wednesday at Savvy Southern Style 
and Bokeh Party at Tracy's Trinkets and Treasures
and Friday Photo Challenge at Razmataz

Wednesday, 19 May 2010

Wedding Inspiraton: Adding the Personal Touch

I've been collecting ideas from around blogland to show my son, Malcolm, and his fiance, Christie, to help them make their wedding special.  Today I thought I would show three different ideas I have found to make a wedding personal and fun - all the while keeping the budget in mind.

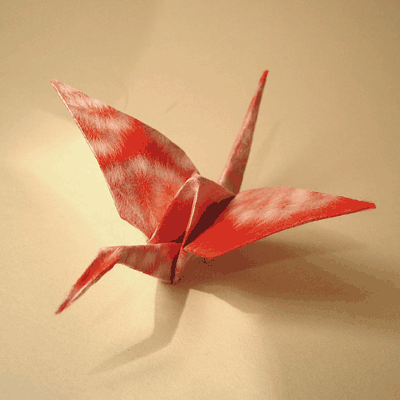
1. Origami Cranes - both my oldest son and my daughter know how to fold these cranes.  I think they would look lovely on each plate at the table.  They could be done in red, which is the colour that will be used at the wedding.  Did you know that according to Japanese tradition, you will have a prosperous marriage if you fold 1,000 paper cranes before your wedding.  The crane mates for life and symbolizes peace and longevity in Asian culture.


 2. Make your own Photo-booth.  Use a sheet to make a colourful backdrop to have informal shots of guests taken during the reception.  You can add props to make it fun, like feather boas, foam swords, mustaches, sunglasses, crowns, hats, fans, and even a blackboard to write messages.  There is a good article here.
 
Photo from The Wed Hub
 

 Photo from Green Wedding Shoes

3.  Put photos of parents and grandparents weddings up on the guest table.


Don't those ideas look creative and fun!  Anyone else have interesting ideas they used at their own wedding?  Or have seen at other people's weddings? Or have seen in blogland?  I would love to know about them.

****************************************
Just a reminder to enter my Cottage Charm giveaway.

Related Posts Plugin for WordPress, Blogger...